Hey there, folks! So, you're thinking about building a pole barn? That's awesome! It's a fantastic way to add extra space to your property, whether you're looking for a workshop, a garage, or just a place to store your stuff. But before you grab your tools and start digging, there's one important thing to consider: the foundation.
You see, building on solid ground is crucial for a stable pole barn. And that's where soil types come in - because just like we all have our quirks, so do different soils. Some are super sturdy, while others are a little more… fickle.
Don't worry, though! We're going to break down the different soil types and how to build a solid foundation for your pole barn no matter what the earth throws your way.
### Understanding Your Soil: The Groundwork for Success
First things first, you gotta know what you're dealing with. There are three main soil types to be aware of:
1. Sandy Soil: Think of this as the beach bum of the soil world. It's loose, drains well, and doesn't hold water very well. This can be good for drainage but also makes it less stable for foundations.
2. Clay Soil: This is the drama queen of the soil family. It's dense, holds a ton of water, and can shrink and swell depending on moisture. It can make building a foundation tricky, but not impossible!
3. Loam Soil: This is the goldilocks of soil - not too loose, not too dense, just right. It's a mix of sand, silt, and clay, which makes it perfect for holding moisture but also draining well. Loam is the dream for pole barn foundations!
### Choosing the Right Foundation: A Solid Base for Your Dream Barn
Now that you know what type of soil you've got, let's talk about foundation options. Here are the most common choices:
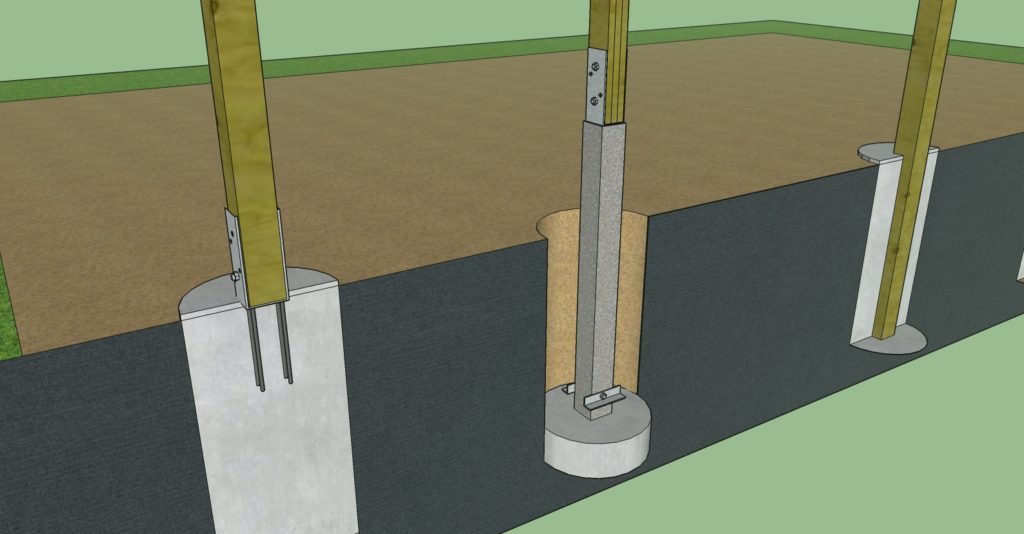
1. Concrete Piers: These are like concrete pillars that are set into the ground and support the pole barn. They're strong, durable, and can handle pretty much any soil type.
2. Concrete Footings: These are larger concrete pads that support the poles. They're good for heavier loads and can be adjusted to account for different soil conditions.
3. Gravel Pads: These are less common but work well on solid ground. They involve a layer of crushed stone topped with a layer of gravel.
4. Sonotube Foundations: These are hollow tubes filled with concrete. They're typically used in sandy soils and can be adjusted to the depth needed.
### Building Your Foundation: A Step-by-Step Guide
Alright, now we're getting down to the nitty-gritty. Let's break down the construction process, starting with the crucial step of soil preparation:
1. Clear the Area: Get rid of any trees, stumps, or debris that could interfere with your foundation. Don't be afraid to break out the heavy machinery if needed!
2. Level the Ground: Use a level and some topsoil to ensure your foundation is perfectly flat. You want your barn to be standing tall and proud, not leaning to one side!
3. Excavate the Soil: This is where knowing your soil type comes in handy. For clay soil, you'll need to excavate deeper to reach stable ground. For sandy soil, you'll need to add compacted gravel to create a stable base.
Now, let's get to the building:
Concrete Piers:
1. Dig Holes: Dig holes for the piers using a post hole digger or auger. Make sure they're deep enough to reach solid ground.
2. Place Forms: Install forms to shape the piers. These are typically made of wood or plastic.
3. Pour Concrete: Mix and pour concrete into the forms, ensuring it fills the entire space and reaches the top of the forms.
4. Cure the Concrete: Let the concrete cure for at least 24 hours before removing the forms.
Concrete Footings:
1. Prepare the Area: Dig a trench for the footings and backfill it with gravel for drainage.
2. Place Forms: Install forms to create the desired size and shape of your footings.
3. Pour Concrete: Mix and pour concrete into the forms, ensuring it fills the entire space and reaches the top of the forms.
4. Cure the Concrete: Let the concrete cure for at least 24 hours before removing the forms.
Gravel Pads:
1. Excavate and Compact: Dig out an area for the pad and compact the soil thoroughly.
2. Place Gravel: Spread a layer of crushed stone and compact it well.
3. Add Top Layer: Top the crushed stone with a layer of gravel and compact it again.
Sonotube Foundations:
1. Install Sonotubes: Drive the sonotubes into the ground, making sure they are level and plumb.
2. Pour Concrete: Pour concrete into the sonotubes, allowing it to cure for at least 24 hours.
### Finishing Touches: A Solid Foundation, a Solid Barn
Once your foundation is set, you can start building your barn. Make sure to use pressure-treated lumber for the poles to protect them from moisture and rot.
Here are some tips for success:
Anchor your poles securely to the foundation. Use strong bolts and proper fastening techniques.
Install a vapor barrier around your foundation. This will help prevent moisture from seeping into the building.
Insulate your barn. This will help keep your barn comfortable year-round.
### A Final Word: Building a Strong Foundation, Building a Strong Barn
Remember, building a solid foundation is crucial for any pole barn. By understanding your soil and choosing the right foundation type, you can ensure your barn stands tall and strong for years to come.
So, grab your tools, get your hands dirty, and start building that dream barn! You got this!
0 comments:
Post a Comment
Note: Only a member of this blog may post a comment.