wade mark

DIY Wood Pallet Shed: Build a Sturdy and Reliable Shed Today

Posted by gate
DIY Wood Pallet Shed: Build a Sturdy and Reliable Shed Today

DIY Wood Pallet Shed: Build a Sturdy and Reliable Shed Today

Tired of overflowing garages and cluttered yards? Yearning for extra storage space without breaking the bank? Then building your own shed from reclaimed wood pallets might be the perfect project for you! This guide walks you through constructing a sturdy and reliable shed, utilizing inexpensive and readily available materials. Get ready to unleash your inner builder and transform your outdoor space.

Planning Your Pallet Shed Project

Before you dive into hammering and sawing, careful planning is crucial. Start by determining the size and location of your future shed. Consider the available space in your yard, local building codes, and the amount of storage you require. Sketch a basic design, noting the dimensions of your pallet-based walls, roof, and floor. This preliminary planning will prevent costly mistakes and ensure a smooth building process. You'll also need to source your pallets; inspect them carefully for rot, warping, and any protruding nails that might pose a safety hazard. Clean them thoroughly before starting construction.

Choosing the Right Pallets

Not all pallets are created equal. Look for heat-treated pallets, which are marked with the HT stamp. These are safer to use than chemically treated pallets (marked with MB). Avoid pallets showing significant signs of damage or infestation. Consider the size and condition of the pallets when planning your shed's dimensions. The stronger and straighter the pallets, the sturdier your shed will be.

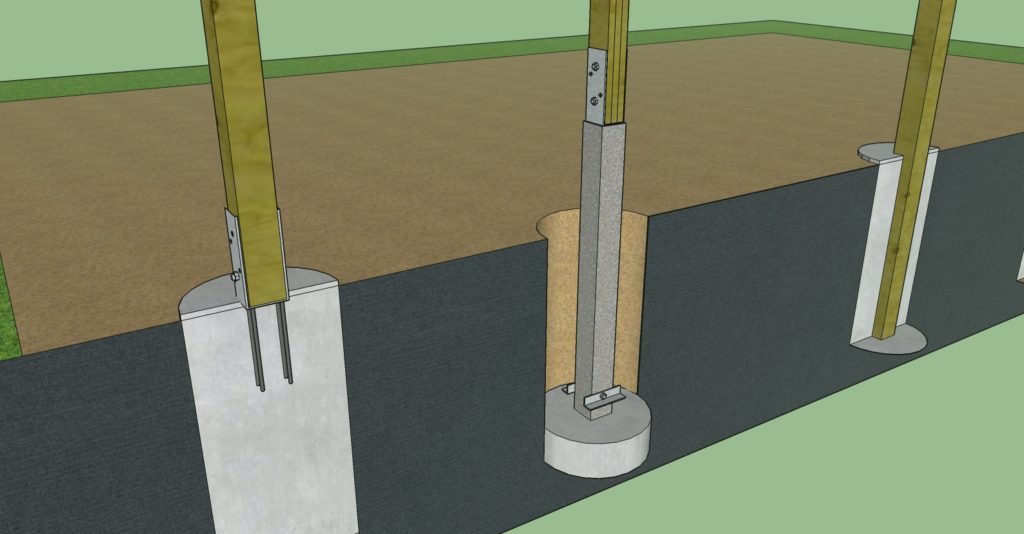
Building the Foundation and Frame

Constructing a solid foundation is essential for a stable shed. You can opt for a simple concrete slab, a gravel base, or even pressure-treated lumber for a raised foundation. Once your foundation is secure, you'll begin assembling the frame of your shed. Use sturdy 4x4 posts and 2x4 beams to create a robust framework that can withstand the weight of the pallets and the elements. Securely fasten all connections using appropriate screws and/or nails. Ensure the frame is perfectly square and level, as any imperfections will be amplified during the construction process.

Securing the Pallet Walls

Attach the pallets to the frame, ensuring a tight fit and utilizing sufficient fasteners. Consider staggering the pallets for added strength and a visually appealing look. For gaps between pallets, fill them with weather-resistant sealant or caulk to prevent drafts and moisture penetration. You may need to cut some pallets to fit perfectly and create a clean finish. Remember safety precautions and always wear appropriate protective gear.

Roofing and Finishing Touches

For your roof, you have several options: a simple gable roof, a shed roof, or even a flat roof (depending on local climate). Use appropriate roofing materials such as asphalt shingles, metal roofing, or even recycled materials, ensuring they're adequately waterproof. Remember to consider the weight of the roofing materials when planning your frame. Once the roof is complete, add a door and any necessary windows, ensuring they’re securely fixed to the frame. To protect your shed from the elements, consider applying a protective sealant or paint to both the exterior and interior. This will prolong the life of your structure and enhance its aesthetic appeal.

Adding the Finishing Touches

Personalize your shed! Add shelving, hooks, or other storage solutions to maximize its functionality. Consider adding a padlock to enhance security. A fresh coat of paint can significantly enhance the shed's appearance and help to protect it from the elements. Remember to clean up any debris from the construction process.

Safety First!

Throughout the entire project, prioritize safety. Wear safety glasses, work gloves, and sturdy footwear. Use caution when handling power tools, and always ensure proper ventilation when working with paints or sealants. Carefully inspect the pallets for nails and splinters before handling. If you're unsure about any aspect of the construction, seek assistance from a qualified builder.

Building a pallet shed is a rewarding experience. Enjoy the process, embrace your creativity, and revel in the satisfaction of creating something useful and unique from recycled materials. You’ll not only save money, but also contribute to sustainable living!

DIY Pallet Shed Plans for Cost-Effective Outdoor Projects

Posted by gate
DIY Pallet Shed Plans for Cost-Effective Outdoor Projects

DIY Pallet Shed Plans for Cost-Effective Outdoor Projects

Constructing a shed can be a significant investment, both financially and in terms of time commitment. However, by utilizing readily available and inexpensive reclaimed materials such as pallets, a substantial reduction in overall costs can be achieved. This article provides comprehensive DIY pallet shed plans, guiding readers through the process of designing and building a functional and aesthetically pleasing outdoor storage solution.

Planning and Design Considerations

Before embarking on the construction process, meticulous planning is crucial to ensure the success of the project. Several key factors warrant careful consideration:

Determining Shed Dimensions and Functionality

The dimensions of the shed should be determined based on its intended use and the available space. Consider the items that will be stored within the shed and allow ample room for convenient access. Smaller sheds are simpler to construct and require fewer materials, while larger structures offer increased storage capacity. Accurate measurements are paramount; any discrepancies can significantly impact the structural integrity of the finished shed.

Sourcing and Assessing Pallets

The foundation of this project rests upon the acquisition of suitable pallets. Source pallets from reputable sources, ensuring they are free from rot, significant damage, and any hazardous materials. Inspect each pallet carefully; reject any showing signs of decay or structural weakness. The number of pallets required will depend on the shed’s planned dimensions and design.

Choosing a Suitable Location

The location of the shed should be carefully chosen, considering factors such as sun exposure, proximity to utilities, and accessibility. Ensure the ground is level and provides adequate drainage to prevent water accumulation and potential structural damage. Obtaining necessary permits before commencing construction is essential, particularly for larger structures or those situated in areas with stringent building regulations.

Materials and Tools Required

Beyond the reclaimed pallets, several additional materials and tools are necessary for the successful completion of the project:

Essential Materials

  • Concrete blocks or treated lumber for the base: Providing a stable foundation prevents the shed from settling unevenly.
  • Screws and nails: Galvanized or stainless steel fasteners are recommended for enhanced durability and weather resistance.
  • Wood glue: Supplementing the fasteners with wood glue increases the structural integrity of the joints.
  • Plywood or sheet metal for roofing: Choose a material that provides sufficient weather protection and complements the overall aesthetic.
  • Paint or sealant: Protecting the wood from the elements extends the shed’s lifespan.
  • Hinges and a latch for the door: Select sturdy and weather-resistant hardware.

Essential Tools

  • Measuring tape and level: Accuracy in measurements is critical for a structurally sound shed.
  • Hammer and screwdriver (or drill): Essential for securing the pallets and other materials.
  • Saw (circular saw or hand saw): Used to cut pallets and other materials to size.
  • Safety glasses and gloves: Protecting your eyes and hands is paramount throughout the construction process.
  • Shovel (for preparing the base): Leveling the ground and creating a stable foundation is critical.

Step-by-Step Construction Guide

The following steps provide a detailed guide to constructing your pallet shed:

Foundation Construction

Begin by preparing a level base. This can be achieved by laying concrete blocks or constructing a simple frame using pressure-treated lumber. Ensure the base is level and large enough to accommodate the shed's dimensions. This foundation provides stability and protects the pallets from direct ground contact, mitigating rot and decay.

Pallet Assembly and Wall Construction

Carefully disassemble the pallets, removing any loose or damaged components. Inspect the remaining wood for any signs of rot or insect infestation. Construct the shed walls by vertically stacking and securing the pallets using screws and wood glue. Ensure the walls are plumb and aligned. The number of pallets used per wall will depend on the overall height of the desired structure.

Roof Construction

The roof design can vary depending on preference and the shed’s dimensions. A simple gable roof or a flat roof can be created using plywood sheets or sheet metal. Ensure adequate overhang to protect the walls from rain and snow. Secure the roofing material to the top of the assembled walls using screws and appropriate sealants.

Door Installation and Finishing Touches

Create the shed door by using additional pallets, constructing a frame, and attaching hinges and a latch. Consider adding a lock for enhanced security. Once the door is installed, apply a weather-resistant paint or sealant to all exposed wood surfaces to protect against the elements. This extends the lifespan of your shed.

Safety Precautions and Considerations

Safety should be a paramount concern throughout the construction process. Always wear appropriate safety gear, including safety glasses and gloves. When using power tools, ensure proper training and adherence to safety guidelines. Be aware of the potential hazards associated with working with wood and other materials. Proper disposal of any waste material is crucial, ensuring adherence to local regulations.

Cost Savings and Environmental Benefits

Utilizing reclaimed pallets significantly reduces the overall cost of constructing a shed compared to using new materials. This approach also offers significant environmental benefits by promoting sustainability and reducing waste. By repurposing existing materials, the project contributes to a more eco-friendly approach to outdoor construction.

Conclusion

Building a DIY pallet shed provides a cost-effective and environmentally conscious solution for outdoor storage needs. With careful planning, attention to detail, and adherence to safety guidelines, the construction process is achievable for individuals with moderate DIY skills. This comprehensive guide serves as a practical roadmap, enabling you to create a functional and aesthetically pleasing shed that enhances your outdoor space.

10x12 Pallet Shed Plans for Gardeners and DIY Enthusiasts

Posted by gate
10x12 Pallet Shed Plans for Gardeners and DIY Enthusiasts

10x12 Pallet Shed Plans for Gardeners and DIY Enthusiasts

Tired of overflowing garden tools and cramped storage? Dreaming of a dedicated space to nurture your seedlings or tinker on your latest project? Building your own 10x12 pallet shed offers a fantastically affordable and rewarding solution. This detailed guide provides comprehensive plans, empowering you to create a durable and stylish storage shed, perfectly tailored to your needs. Forget expensive pre-fabricated sheds â€" let's build something truly unique together!

Planning Your 10x12 Pallet Shed

Before you grab a hammer, meticulous planning ensures a smooth build. Begin by carefully considering your location. Choose a level, well-drained spot with easy access. Next, assess the number of pallets you’ll need. A 10x12 shed requires a significant number, and slight variations in pallet dimensions exist, so overestimate rather than underestimate. Measure your available pallets to determine the exact number needed and plan your layout accordingly. Finally, source your materials: besides pallets, you'll need screws, roofing material (metal, shingle, or even recycled plastic), and possibly additional lumber for reinforcement and framing.

Gathering Your Materials and Tools

This project relies heavily on reclaimed pallets, offering an eco-friendly and budget-friendly approach. Inspect each pallet carefully, discarding any with significant damage. Sort them by size and condition to optimize your construction. Beyond the pallets, gather the following essential tools:

  • Measuring tape and level
  • Hammer or impact driver
  • Drill with various drill bits
  • Screws (various lengths for different applications)
  • Safety glasses and work gloves
  • Circular saw (or hand saw)
  • Post hole diggers (if anchoring to the ground)
  • Your chosen roofing material and fasteners
  • Optional: Pallet jacks for easier pallet handling

Constructing the Frame: A Step-by-Step Guide

Laying the Foundation

Begin by creating a level base. This could involve laying down a concrete slab, compacted gravel, or even a sturdy wooden platform. This ensures stability and protects the pallets from moisture. Use your level to guarantee a perfectly flat surface for the pallet structure.

Building the Walls

Construct the walls by strategically arranging and securing the pallets. Use long screws to fasten the pallets together, creating sturdy walls. Consider adding vertical support beams where needed for extra stability, especially given the size of the shed. Prioritize creating strong corner joints, and pre-assemble sections wherever possible to simplify the process. Ensure that the walls are plumb and square.

Raising the Walls and Creating the Roof

Carefully lift and connect the assembled wall sections. You may require assistance for this stage. Secure the walls using additional bracing to ensure stability. The roof design can vary, from a simple gable to a more complex shed roof. Plan your roof framing accordingly, making sure the structure can support your chosen roofing material. Attach the roofing material following the manufacturer’s instructions.

Adding Finishing Touches and Personalization

Once the structure is complete, consider adding finishing touches. This could include installing a door, windows for ventilation and light, or even adding a simple paint job for added aesthetic appeal. You can personalize your shed further with shelving, hooks for tools, and other storage solutions tailored to your specific needs. Consider weatherproofing the exterior using a sealant to protect against moisture damage.

Safety First!

Remember to prioritize safety throughout the entire building process. Always wear appropriate safety gear, such as safety glasses and work gloves. Use caution when working with power tools, and seek assistance for lifting heavy pallets. Properly anchoring your shed to the ground is crucial, especially in areas prone to strong winds.

Building a 10x12 pallet shed is a rewarding undertaking that transforms your outdoor space. With careful planning, the right tools, and a bit of elbow grease, you’ll soon enjoy a custom-built storage solution perfectly suited to your gardening and DIY needs. Happy building!

Create a Functional and Stylish 10x12 Pallet Shed with These Plans

Posted by gate
Create a Functional and Stylish 10x12 Pallet Shed with These Plans

Constructing a Functional and Stylish 10x12 Pallet Shed: A Comprehensive Guide

This document provides a detailed blueprint for the construction of a 10x12 foot pallet shed, emphasizing both functionality and aesthetic appeal. The design incorporates readily available reclaimed pallet wood, minimizing material costs while promoting sustainability. This guide outlines the planning, material acquisition, construction process, and finishing touches necessary for creating a durable and visually pleasing storage solution.

Phase 1: Planning and Design

Before commencing construction, meticulous planning is paramount. This phase involves determining the shed's location, finalizing the design, and acquiring the necessary permits. Proper planning ensures a smooth and efficient building process.

Site Selection and Preparation

The chosen location should be level, accessible, and provide adequate drainage. Consider factors such as sunlight exposure, proximity to power sources (if applicable), and potential obstructions. Once the location is finalized, the ground should be leveled and cleared of any debris or vegetation. This may involve excavation and the addition of a compacted gravel base to ensure stability.

Design Considerations

The 10x12 footprint offers ample storage space. The design should account for the following:

  • Door Placement and Size: Strategically place the door for optimal access and to avoid obstructing internal space. Consider double doors for larger items.
  • Window Placement: Incorporate windows to maximize natural light and ventilation. The number and size should be determined based on the shed's location and intended use.
  • Roof Design: A gable roof offers superior drainage and is aesthetically pleasing. Consider the roof's pitch to ensure efficient water runoff.
  • Internal Shelving and Organization: Plan for internal shelving or storage solutions to optimize space utilization. Consider the types of items that will be stored to determine the optimal shelving configuration.
  • Foundation: Choose a suitable foundation based on your budget and soil conditions. Options include a concrete slab, compacted gravel, or pressure-treated lumber.

Permitting and Regulations

Contact your local building department to determine if permits are required for the construction of a shed of this size. Compliance with local building codes is crucial to avoid potential legal issues and ensure the safety and structural integrity of the shed.

Phase 2: Material Acquisition and Preparation

The primary material for this project is reclaimed pallet wood. Careful selection and preparation of these materials are crucial for the success of the project.

Sourcing Pallet Wood

Source pallets from reputable suppliers or salvage yards. Ensure the pallets are free from rot, significant damage, and harmful chemicals. Inspect each pallet thoroughly before accepting it. Prioritize pallets constructed from high-quality, durable lumber.

Pallet Deconstruction and Wood Preparation

Disassemble the pallets carefully, removing nails and staples. Inspect each board for damage and discard any unusable pieces. Clean the boards thoroughly to remove dirt, debris, and any remaining nails. Sand the boards to achieve a smoother surface and to remove splinters. Consider treating the wood with a suitable sealant or preservative to protect it from moisture damage and insect infestation.

Additional Materials

In addition to reclaimed pallet wood, you will require the following materials:

  • Foundation Materials: Concrete, gravel, or pressure-treated lumber, depending on the chosen foundation type.
  • Fasteners: Galvanized nails, screws, and other appropriate fasteners.
  • Roofing Materials: Asphalt shingles, metal roofing, or other suitable roofing material.
  • Door and Window Materials: Pre-made doors and windows or materials to construct your own.
  • Hardware: Hinges, handles, latches, and other necessary hardware.
  • Sealants and Paint/Stain (Optional): To protect the wood and enhance the aesthetic appeal.

Phase 3: Construction

This phase involves the actual construction of the shed, following the established design and utilizing the prepared materials. Attention to detail and adherence to proper construction techniques are essential for a durable and structurally sound shed.

Foundation Construction

Construct the chosen foundation. For a concrete slab, pour and level the concrete according to the manufacturer's instructions. For a gravel base, compact the gravel thoroughly to ensure a level and stable surface. For a lumber foundation, treat the lumber with a preservative and construct a frame to support the shed.

Framing and Wall Construction

Construct the shed's frame using the prepared pallet wood. Ensure the frame is square and plumb. Attach the wall panels to the frame, ensuring proper alignment and securing them with appropriate fasteners. Consider adding bracing for added structural stability.

Roof Construction

Construct the roof frame according to the chosen design. Install the roofing material, ensuring proper overlap and sealing to prevent water leakage. Consider adding ridge vents for improved ventilation.

Door and Window Installation

Install the pre-made or constructed doors and windows, ensuring they are securely fastened and function properly.

Phase 4: Finishing Touches

This phase focuses on enhancing the shed's aesthetics and functionality. This involves adding finishing touches such as painting, staining, or sealing the wood, as well as installing any additional features.

Exterior Finishing

Apply a sealant, paint, or stain to protect the wood and enhance its appearance. Choose a finish that is suitable for exterior use and offers protection against the elements.

Interior Finishing

Install any interior shelving or storage solutions. Consider adding lighting or electrical outlets if desired.

Landscaping and Final Touches

Landscape around the shed to improve its aesthetic appeal and prevent erosion. Add any final touches, such as a walkway or decorative elements.

By following these detailed steps, you can construct a functional and stylish 10x12 pallet shed that provides ample storage while showcasing the beauty of reclaimed wood. Remember to always prioritize safety and adhere to building codes throughout the entire construction process.

12x20 Shed Plans with Loft: Maximize Storage and Space

Posted by gate
12x20 Shed Plans with Loft: Maximize Storage and Space

12x20 Shed Plans with Loft: Maximize Storage and Space

So, you're dreaming of a bigger, better shed â€" one that's not just a dumping ground for garden tools but a truly organized and functional space. A 12x20 shed offers a fantastic footprint, but adding a loft? That's where the magic happens! Let's dive into how you can maximize storage and space in your very own 12x20 shed with a loft.

Planning Your 12x20 Shed with Loft

Before you even think about hammering a nail, proper planning is key. Think of this stage as the architectural blueprint for your storage masterpiece. It's tempting to jump straight into building, but trust me, a little pre-planning will save you headaches (and potentially money) down the line.

Defining Your Needs

What will you primarily store in your shed? Garden equipment? Seasonal decorations? A workshop? Knowing your storage needs will dictate the layout of your shed and loft. Consider:

  • Tool storage: Will you need workbench space? Wall-mounted racks? Drawers?
  • Seasonal items: Do you need space for Christmas decorations, summer furniture, or camping gear?
  • Workshop area: If you plan on using it as a workshop, factor in space for power tools, a vise, and comfortable working space.
  • Accessibility: How easily will you need to access items? Will you need to frequently climb into the loft?

Choosing the Right Materials

The materials you select will impact the longevity and overall cost of your shed. Consider factors like:

  • Wood: Pressure-treated lumber is a popular choice for its durability and resistance to rot. Cedar and redwood are aesthetically pleasing options but can be more expensive.
  • Metal: Metal sheds are known for their strength and resistance to weather damage, but they can be more susceptible to dents and scratches.
  • Vinyl: Vinyl sheds offer low maintenance and are resistant to insects and rot, but they can be more expensive than wood.

Designing the Loft

The loft is the star of the show! Here’s where you can get creative. Think about:

  • Loft Access: A sturdy staircase or a pull-down ladder are common choices. Consider your age and physical capabilities when making this decision.
  • Loft Height: Aim for at least 4-5 feet of headroom in the loft to allow for comfortable movement and storage access. Remember to account for the loft framing when planning height.
  • Loft Supports: Ensure your loft framing is strong enough to support the weight of your stored items. Consider using engineered lumber or strategically placed beams.
  • Loft Flooring: Use plywood or OSB for a durable and level surface. It’s crucial that the floor can handle your expected load.

Optimizing Space and Storage

A 12x20 shed with a loft offers incredible storage potential, but clever design is key to maximizing it. Here are some tips:

Vertical Space is Your Friend

Don't be afraid to utilize vertical space to the fullest. Install shelving units on the walls, both in the main area and the loft. Think tall, narrow shelves to make the most of every inch.

Maximize Wall Space

Mount pegboards, tool racks, and hooks to keep tools organized and easily accessible. Consider using magnetic strips for smaller metal items. This keeps things off the floor and prevents clutter.

Utilize Overhead Storage

If you have sufficient ceiling height, consider overhead storage racks for less frequently used items. This frees up valuable floor space.

Smart Shelving Solutions

Invest in adjustable shelving units. This way you can customize your shelves to fit items of various sizes, optimizing space and preventing wasted area.

Building Your 12x20 Shed with Loft

Once your plans are finalized and materials are gathered, it's time to break ground! While I can't guide you through every step of the construction process here, I can give you some general advice.

Foundation

Start with a solid foundation. Concrete slabs or pier and beam foundations are common and offer stability. The type of foundation you choose will depend on your soil conditions and local building codes.

Framing

Construct the walls and roof framing according to your plans. Ensure all framing members are properly braced and secured.

Sheathing and Siding

Install sheathing over the framing, then cover it with your chosen siding material. This protects the structure from the elements.

Roofing

Install roofing felt and your chosen roofing material (asphalt shingles, metal, etc.). Ensure proper ventilation to prevent moisture buildup.

Loft Construction

Once the main structure is complete, carefully construct the loft framing. Add the flooring and ensure it’s securely attached to the framing.

Finishing Touches

Add doors, windows, trim, and any other finishing touches to complete your shed.

Commonly Asked Questions

Building a shed can raise many questions. Here are some commonly asked ones:

  • Q: Do I need a permit to build a shed? A: Building codes vary by location. Check with your local building department to see if a permit is required.
  • Q: How much does it cost to build a 12x20 shed with a loft? A: The cost depends on materials, labor, and location. Expect a significant investment, but it's often less expensive than buying a pre-built shed of similar size and features.
  • Q: How long does it take to build a 12x20 shed with a loft? A: The time varies based on experience and the complexity of the design. Expect it to take several weeks to complete, possibly longer for first-time builders.
  • Q: Can I build a 12x20 shed with a loft myself? A: Yes, many people successfully build their own sheds. However, it requires basic carpentry skills and a willingness to learn. If you're unsure, consider hiring a professional.
  • Q: What about insulation? A: Insulating your shed, especially the loft, can significantly increase its usability year-round, especially in colder climates. Consider adding insulation during construction to prevent future problems.

Building a 12x20 shed with a loft is a rewarding project. With careful planning, attention to detail, and a dash of DIY spirit, you can create a fantastic storage solution that will serve you well for years to come! Remember to always prioritize safety and follow building codes for a successful project.

How to Make a Pole Barn with a Foundation for All Types of Soil

Posted by gate
How to Make a Pole Barn with a Foundation for All Types of Soil


Hey there, folks! So, you're thinking about building a pole barn? That's awesome! It's a fantastic way to add extra space to your property, whether you're looking for a workshop, a garage, or just a place to store your stuff. But before you grab your tools and start digging, there's one important thing to consider: the foundation.

You see, building on solid ground is crucial for a stable pole barn. And that's where soil types come in - because just like we all have our quirks, so do different soils. Some are super sturdy, while others are a little more… fickle.

Don't worry, though! We're going to break down the different soil types and how to build a solid foundation for your pole barn no matter what the earth throws your way.

### Understanding Your Soil: The Groundwork for Success

First things first, you gotta know what you're dealing with. There are three main soil types to be aware of:

1. Sandy Soil: Think of this as the beach bum of the soil world. It's loose, drains well, and doesn't hold water very well. This can be good for drainage but also makes it less stable for foundations.

2. Clay Soil: This is the drama queen of the soil family. It's dense, holds a ton of water, and can shrink and swell depending on moisture. It can make building a foundation tricky, but not impossible!

3. Loam Soil: This is the goldilocks of soil - not too loose, not too dense, just right. It's a mix of sand, silt, and clay, which makes it perfect for holding moisture but also draining well. Loam is the dream for pole barn foundations!

### Choosing the Right Foundation: A Solid Base for Your Dream Barn

Now that you know what type of soil you've got, let's talk about foundation options. Here are the most common choices:

1. Concrete Piers: These are like concrete pillars that are set into the ground and support the pole barn. They're strong, durable, and can handle pretty much any soil type.

2. Concrete Footings: These are larger concrete pads that support the poles. They're good for heavier loads and can be adjusted to account for different soil conditions.

3. Gravel Pads: These are less common but work well on solid ground. They involve a layer of crushed stone topped with a layer of gravel.

4. Sonotube Foundations: These are hollow tubes filled with concrete. They're typically used in sandy soils and can be adjusted to the depth needed.

### Building Your Foundation: A Step-by-Step Guide

Alright, now we're getting down to the nitty-gritty. Let's break down the construction process, starting with the crucial step of soil preparation:

1. Clear the Area: Get rid of any trees, stumps, or debris that could interfere with your foundation. Don't be afraid to break out the heavy machinery if needed!
2. Level the Ground: Use a level and some topsoil to ensure your foundation is perfectly flat. You want your barn to be standing tall and proud, not leaning to one side!
3. Excavate the Soil: This is where knowing your soil type comes in handy. For clay soil, you'll need to excavate deeper to reach stable ground. For sandy soil, you'll need to add compacted gravel to create a stable base.

Now, let's get to the building:

Concrete Piers:

1. Dig Holes: Dig holes for the piers using a post hole digger or auger. Make sure they're deep enough to reach solid ground.
2. Place Forms: Install forms to shape the piers. These are typically made of wood or plastic.
3. Pour Concrete: Mix and pour concrete into the forms, ensuring it fills the entire space and reaches the top of the forms.
4. Cure the Concrete: Let the concrete cure for at least 24 hours before removing the forms.

Concrete Footings:

1. Prepare the Area: Dig a trench for the footings and backfill it with gravel for drainage.
2. Place Forms: Install forms to create the desired size and shape of your footings.
3. Pour Concrete: Mix and pour concrete into the forms, ensuring it fills the entire space and reaches the top of the forms.
4. Cure the Concrete: Let the concrete cure for at least 24 hours before removing the forms.

Gravel Pads:

1. Excavate and Compact: Dig out an area for the pad and compact the soil thoroughly.
2. Place Gravel: Spread a layer of crushed stone and compact it well.
3. Add Top Layer: Top the crushed stone with a layer of gravel and compact it again.

Sonotube Foundations:

1. Install Sonotubes: Drive the sonotubes into the ground, making sure they are level and plumb.
2. Pour Concrete: Pour concrete into the sonotubes, allowing it to cure for at least 24 hours.

### Finishing Touches: A Solid Foundation, a Solid Barn

Once your foundation is set, you can start building your barn. Make sure to use pressure-treated lumber for the poles to protect them from moisture and rot.

Here are some tips for success:

Anchor your poles securely to the foundation. Use strong bolts and proper fastening techniques.
Install a vapor barrier around your foundation. This will help prevent moisture from seeping into the building.
Insulate your barn. This will help keep your barn comfortable year-round.

### A Final Word: Building a Strong Foundation, Building a Strong Barn

Remember, building a solid foundation is crucial for any pole barn. By understanding your soil and choosing the right foundation type, you can ensure your barn stands tall and strong for years to come.

So, grab your tools, get your hands dirty, and start building that dream barn! You got this!

How to Build a Pole Barn with a Classic Gambrel Roof

Posted by gate
How to Build a Pole Barn with a Classic Gambrel Roof


Alright, folks, let's talk pole barns! These sturdy, versatile structures are perfect for everything from workshops and garages to storage and even living spaces. And let's be honest, what's cooler than a classic gambrel roof? It's like a little slice of Americana, a nod to the barns of our ancestors. So, if you're ready to embark on the exciting journey of building your own pole barn with a gambrel roof, grab a cup of coffee, get comfy, and let's dive in!

### Step 1: Planning and Design

Before you start swinging a hammer, you gotta have a plan. Here's where the fun really starts!

Decide on your purpose: What will your pole barn be used for? This will dictate its size, layout, and even the materials you'll use.
Sketch it out: Get a basic idea of your barn's dimensions and overall layout. Don't worry about being an artist, a simple drawing will do.
Check local regulations: Before you start digging, make sure your plans align with local building codes and zoning ordinances.
Material selection: Choose your materials wisely. For the poles, consider pressure-treated lumber for durability. Metal roofing is popular for its low maintenance and longevity.
Roof pitch: Gambrel roofs have two slopes, giving them that classic barn look. The steeper slope is generally around 4/12 to 6/12, while the lower slope can range from 2/12 to 4/12.

### Step 2: Site Preparation

Now it's time to get your hands dirty!

Clear the site: Remove any trees, vegetation, or debris.
Level the ground: Use a level to ensure the site is flat and level.
Dig the pole holes: The depth of your holes will depend on the frost line in your area and the length of your poles.
Set the poles: Use a plumb bob to ensure the poles are perfectly vertical. Secure them temporarily with braces until you pour the concrete.

### Step 3: Concrete Foundation

This is where it gets real. Time to make your barn sturdy as a rock!

Pour the concrete: Mix the concrete according to the manufacturer's instructions. Be sure to adequately support the poles while the concrete sets.
Level and cure: Use a level to ensure the concrete is flat and even. Allow the concrete to cure properly, which can take several days depending on the weather.

### Step 4: Framing and Roofing

Time to build the bones of your barn!

Wall framing: Attach the wall framing to the poles, using joists or studs depending on your design.
Roof framing: This is where the gambrel roof magic happens. You'll need to build the steeper upper slope first, followed by the lower slope.
Install sheathing: Use plywood or OSB sheathing to cover the roof and walls, creating a solid surface for the roof and siding.
Install roofing: This is where your choice of roofing material comes into play. Metal roofing is a popular choice due to its durability and low maintenance.

### Step 5: Siding and Trim

Now it's time to give your barn some personality!

Install siding: Choose siding that complements your barn's style. Vinyl, wood, or metal siding are all popular choices.
Install trim: Use trim boards around windows, doors, and the roofline to add a finishing touch.

### Step 6: Doors, Windows, and Finishing Touches

Almost there! Time to add the finishing touches.

Install doors and windows: Choose doors and windows that meet your needs and enhance the aesthetics of your barn.
Insulation: Insulate your barn if you plan to use it as a workshop, living space, or for storage during harsh weather.
Finishing touches: Consider adding features like a loft, an overhang, or a cupola to add character and functionality to your barn.

### Step 7: Enjoy Your New Barn!

Congratulations! You've built your own pole barn with a classic gambrel roof. Take some time to admire your handiwork, and enjoy the fruits of your labor.

### Safety First

Remember, safety is paramount!

Wear appropriate safety gear like gloves, eye protection, and hearing protection.
Follow all manufacturer instructions for materials and tools.
Always use ladders and scaffolding safely.
Never work alone, especially when working at heights.

### Getting Help

Building a pole barn can be a challenging but rewarding project. Don't be afraid to seek help from friends, family, or professionals if you need it. There are also many resources available online and in your community that can guide you through the process.

### Final Thoughts

Building a pole barn is an investment in your property, providing valuable space and character. It's a project that requires planning, hard work, and a touch of ingenuity. With a little dedication and the right approach, you can create a structure that will stand the test of time, just like the classic barns of our forefathers. So, gather your tools, embrace the challenge, and enjoy the journey of creating your own piece of Americana!

How to build a small and affordable 8x10 shed for storage

Posted by gate
How to build a small and affordable 8x10 shed for storage

Alright, so you're thinking about building a shed, huh? You want something small, something affordable, and something that'll keep your stuff safe and sound. An 8x10 shed fits the bill perfectly. It's big enough for a decent amount of storage, but small enough to be manageable for a solo project. And best of all, you can build it without breaking the bank.

Let's get into the nitty-gritty of building an 8x10 shed. We'll break it down step by step, and I'll try to make it as clear as possible, even if you're a complete newbie to DIY projects.

1. Planning and Preparation: The Foundation of Your Shed

Before you even think about grabbing a hammer, take some time to plan. This will save you headaches and heartache down the road. Here's what you need to think about:

Location, Location, Location: Choose a spot that's level, accessible, and has good drainage. You don't want your shed sinking into a muddy mess!
Building Permits: Check with your local building department to see if you need a permit. It's better to be safe than sorry.
Foundation: You've got options! A concrete slab is the most durable, but it's also the most expensive. You can also use treated lumber to build a simple foundation.
Materials: Make a list of the materials you'll need, including lumber, roofing, siding, windows, doors, and fasteners. Don't forget about things like paint, sealant, and insulation if you plan on making it cozy.

2. Building the Foundation: The Solid Base of Your Project

Alright, now it's time to start laying the groundwork, literally. Here's a breakdown for a simple lumber foundation:

Level the Ground: Use a level and shovel to make the ground perfectly flat.
Lay Down Pressure-Treated Lumber: Cut the lumber to size and lay it down in a rectangle. This will be your foundation's frame.
Attach Cross Braces: Add cross-braces to the frame for extra support, especially if you're building on uneven ground.
Secure the Frame: Use screws or lag bolts to hold everything together. Remember, this is the foundation, so make sure it's rock solid!

3. Framing the Walls: Building the Bones of Your Shed

Now we're getting to the fun part, building the walls! This is where your shed really starts to take shape.

Cut the Wall Studs: Use 2x4s or 2x6s, depending on your budget and desired insulation thickness. Cut them to the height of your walls.
Assemble the Wall Frames: Use nails or screws to attach the studs to the bottom plate of the foundation.
Add the Top Plate: Connect the studs with another piece of lumber at the top.
Repeat for All Walls: Build each wall frame, making sure they are perfectly square and plumb.

4. Constructing the Roof: Putting a Cap on Your Creation

Time to build the roof! This is a little more involved, but it's still manageable.

Determine the Roof Pitch: This determines the angle of your roof. A steeper pitch is better for snow and rain, but it also requires more materials.
Build the Roof Trusses: Use 2x4s or 2x6s to create the triangular frames that will support the roof. You can buy pre-made trusses or build them yourself.
Attach the Trusses to the Walls: Place the trusses on top of the wall plates and secure them with screws or nails.
Sheathing the Roof: Cover the trusses with plywood or OSB (oriented strand board) to create a solid surface for the roof shingles.

5. Installing the Doors and Windows: Adding Light and Access

Now it's time to make your shed functional!

Cut the Door and Window Openings: Measure carefully and cut out the openings for your door and windows in the walls.
Install the Door and Window Frames: Attach the frames to the openings, making sure they are level and plumb.
Hang the Door and Install the Windows: Securely attach the door to its frame and install the windows.

6. Siding and Roofing: Giving Your Shed a Facelift

You're almost there! Now it's time to add the finishing touches.

Install the Siding: Choose your siding material â€" vinyl, wood, metal, or composite. Attach the siding to the walls using nails or screws.
Install the Roofing: Shingles are the most common roofing material. Start at the bottom and work your way up, securing each shingle with nails.

7. Finishing Touches: Adding the Finishing Touches

You've done it! Now, it's time to make your shed truly your own.

Paint or Stain: Give your shed a fresh coat of paint or stain to protect it from the elements and give it a personal touch.
Install Gutters and Downspouts: To prevent water damage, add gutters to direct rain away from the foundation.
Insulate and Finish the Interior: Add insulation to the walls and ceiling if you want to use it for climate-controlled storage. You can also add shelves, hooks, and other storage solutions.

8. Enjoying Your New Shed: A Place for Everything

There you have it! Your brand new shed is ready to be filled with all your stuff. Now you can finally get organized and have a dedicated space for everything. Enjoy your hard work, and remember to stay safe and organized throughout the process.

Diy lean-to shed project: a practical storage solution

Posted by gate
Diy lean-to shed project: a practical storage solution


Alright, so you've got stuff. We all do, right? Maybe it's gardening tools, bikes, lawnmower parts, or just boxes of "I'll need this someday" items. Whatever it is, you're tired of tripping over it in the garage or jamming your shed door shut. Sound familiar?

Well, here's the solution: a DIY lean-to shed! It's a simple, cost-effective way to add valuable storage space to your backyard. No fancy tools, no complicated plans â€" just a bit of sweat equity and a whole lot of satisfaction.

First things first, let's talk about the basics. We're talking about a lean-to, which means it's essentially a roof attached to an existing wall. This could be your house, a garage, a fence, or even a sturdy tree. The beauty of this design is that it's easy to build and blends nicely with your existing structure.

Now, let's get down to business. Here's a breakdown of the key steps for your lean-to shed project:

1. Planning and Preparation:

Size and Location: Consider what you need to store and how much space you have. A rough sketch can help you visualize the size and placement of your shed.
Materials: A lean-to shed can be made from a variety of materials, like wood, metal, or even recycled pallets. Choose what suits your budget and skill level.
Permits: Check local building codes and regulations before you start. You might need a permit depending on the size and structure of your shed.
Tools: Gather the necessary tools, including a measuring tape, level, saw, hammer, drill, and safety gear.

2. Building the Foundation:

Leveling the Ground: A solid foundation is key for stability. Clear the area and level the ground where your shed will sit. Consider using gravel or concrete blocks for a more permanent foundation.
Building the Base: If you're going with a wooden frame, use pressure-treated lumber for the base, as it's resistant to rot. Attach the base to the existing wall using heavy-duty brackets or anchors.

3. Constructing the Frame:

The Roof: The roof is the heart of your lean-to. It's typically made of rafters (angled beams) that support the roof sheathing (plywood or OSB). Measure and cut the rafters accurately, ensuring they are properly spaced for support.
Sheathing: Attach the roof sheathing to the rafters, creating a solid base for your roofing material.
Wall Framing (optional): If you want a more enclosed space, you can add walls to your lean-to. Use studs and sheathing to create the walls, just like a regular shed.

4. Adding the Roof and Walls:

Roofing Material: Choose a roofing material that suits your budget and style, like shingles, metal roofing, or even recycled plastic panels. Secure the roofing material to the sheathing according to the manufacturer's instructions.
Siding (optional): If you've added walls, choose siding that complements the existing structure. Wood, vinyl, or metal siding are all popular choices.

5. Finishing Touches:

Doors and Windows (optional): Add doors and windows for easy access and natural light. You can use pre-made doors or build your own.
Paint or Stain: Give your lean-to shed a fresh coat of paint or stain to protect the wood and enhance its look.
Interior Finishing (optional): Add shelves, hooks, or pegboards inside your shed for organization and storage.

Tips for Building Success:

Measure twice, cut once! Accuracy is key in construction.
Use sturdy materials and fasteners. This will ensure your shed lasts for years to come.
Don't be afraid to ask for help. If you're unsure about a step, ask a friend or neighbor for assistance.
Take breaks and stay hydrated. Building a shed is hard work, so remember to take care of yourself.
Enjoy the process! Building something with your own hands is incredibly rewarding.

Beyond the Basics:

Lean-to Shed with a Floor: For added durability and protection from the elements, you can build a floor for your shed. Use pressure-treated lumber for the floor joists and plywood or OSB for the subfloor.
Solar-Powered Lighting: Install solar-powered lights inside your shed for easy illumination.
Ventilation: Consider adding vents to your shed to prevent moisture build-up and improve airflow.

So, what are you waiting for? Gather your tools, plan your project, and get building! A DIY lean-to shed is a simple yet rewarding way to create extra storage space and enhance your backyard. Just remember, safety first, and have fun with the process!

Bonus Tip: Don't be afraid to add your own personal touch to your shed. Think about how you'll use it, and add features that make it unique and functional for you.

Diy garden shed projects for homeowners with limited space

Posted by gate
Diy garden shed projects for homeowners with limited space


Alright, fellow gardeners, let's talk about space. We all dream of a big, spacious garden shed, a haven for our tools and projects. But, sometimes reality bites, and we're left with a limited space to work with. Don't despair! We're not giving up on our shed dreams just yet.

There are some fantastic, compact garden shed designs out there that can fit even the tiniest corner of your yard. And guess what? You can build them yourself!

Think outside the (shed) box:

Vertical is the new horizontal: Forget sprawling footprints. Go up! Vertical sheds, with their tall and narrow profiles, are perfect for small spaces. Imagine a mini-cabin, maybe with a cute little loft for extra storage!
Lean-to, lean-in: A lean-to shed, tucked against your house or fence, can provide a surprisingly spacious storage area without taking up much ground space. Think of it as an extension of your home, just for your gardening tools!
Roundabouts: A round shed, with its unique shape, can be squeezed into tight corners and even create a visual focal point in your garden. Plus, it can offer a surprising amount of storage space.

Picking the Right Size:

Now, let's get practical. Measure your space, and be honest about what you need to store. Do you just need a place for your mower and basic tools, or do you dream of a workspace for potting plants and indulging in craft projects?

Tiny Sheds (4'x4' - 6'x6'): Perfect for storing basic tools, a small mower, and maybe a few gardening supplies. They're easy to build and won't overwhelm your small space.
Mid-Sized Sheds (8'x8' - 10'x12'): Offer a good balance of storage and workspace. You can fit a workbench, some shelves, and even a small potting area.
Large Sheds (12'x16' and up): While these are great if you have the space, they might not be ideal for a tiny backyard. But, who knows, maybe you can swing it!

Building Your Tiny Haven:

Materials:

Wood: Pressure-treated lumber is ideal for the base and exterior walls. Choose from various wood types based on your budget and preferences.
Roofing: Asphalt shingles or metal roofing are durable options for long-lasting protection.
Windows and Doors: Consider the size and placement of these elements carefully for good airflow and natural light.
Hardware: Screws, nails, hinges, locks, etc.

Tools:

Saw: Circular saw, table saw, or jigsaw
Drill: For assembling and attaching hardware
Level: To ensure your shed is built straight and even
Measuring tape: For accurate cutting and placement
Safety gear: Always wear eye protection, gloves, and a dust mask.

Step by Step:

1. Plan and design: Draw a simple plan with measurements. Consider things like window and door placement, and how you'll access the shed.
2. Foundation: You can use concrete blocks, a gravel pad, or a wooden frame.
3. Framing: Build the walls and roof using pressure-treated lumber. Remember to use bracing for stability.
4. Sheathing: Apply plywood or OSB to the walls and roof for a solid base for siding and roofing.
5. Roofing: Lay shingles or metal panels on top of the roof.
6. Siding: Choose your desired siding material and install it carefully.
7. Windows and Doors: Install and trim the windows and doors.
8. Finishing touches: Paint or stain the shed, install shelves, and organize your tools!

Tips for Tiny Shed Success:

Maximize vertical space: Build shelves, use vertical storage solutions, and consider a loft for extra storage.
Choose light and airy colors: A bright, cheerful color scheme can make a small space feel bigger.
Light it up: Install a light fixture for evening work and safety.
Get organized: Use bins, baskets, and labels to keep your tools and supplies tidy.

Building a shed is a rewarding project. And with a little planning and effort, you can create a beautiful and functional space that perfectly fits your needs, no matter how limited your space.

Beyond the Basics:

Feeling ambitious? Here are some ideas to elevate your tiny shed game:

Go green: Use recycled materials, install solar panels, and choose eco-friendly building products.
Add a deck: Create a charming outdoor workspace or a cozy spot to relax and enjoy your garden.
Turn it into a greenhouse: Grow your own herbs, vegetables, or flowers in a beautiful and functional greenhouse.

Don't be afraid to experiment and have fun! Your tiny shed can be a source of pride and joy for years to come. Happy building!

Diy 8x12 shed plans: how to design it, build it, and save money

Posted by gate
Diy 8x12 shed plans: how to design it, build it, and save money


Hey there, fellow DIY enthusiast! Tired of overflowing garages and cramped basements? Ready to tackle a project that'll give you a sense of accomplishment and a whole lot more storage space? Then building your own 8x12 shed is the perfect project for you! It's manageable, rewarding, and, best of all, you can save a ton of cash compared to hiring a contractor. Let's dive into the world of shed-building, shall we?

### Designing Your Dream Shed: More Than Just a Storage Unit

Forget about cookie-cutter sheds! This is your chance to create a space that fits your specific needs. Here's how to design your dream shed:

Function Over Form: First things first, what's your shed going to be used for? Tools? Gardening supplies? A workshop? Knowing this helps determine the layout. You'll need space for shelving, benches, and maybe even a worktable.
Doors and Windows: Consider how you'll access your shed and what kind of natural light you want. Double doors are great for moving large items, while a single door might be sufficient for smaller sheds. Windows add ventilation and brighten the interior.
Roof Style: Go for a simple gable roof for a classic look and easy construction. If you want something more unique, consider a shed with a hip roof or even a gambrel roof for more vertical space.
Materials: Wood is the most common and affordable material for sheds. Pressure-treated lumber is essential for the foundation and bottom plates to resist rot.
Finishing Touches: What about paint, siding, and trim? Choose colors that blend in with your landscape or make a bold statement! Don't forget about the roof â€" shingles, metal roofing, or even recycled plastic tiles offer various options.

### Getting Started: The Foundation is Key

Before you start hammering and sawing, you need a solid foundation. Here are a few options:

Concrete Slab: The most durable option, but also the most expensive. This is ideal if your shed will be used for heavy equipment or if you're in a frost-prone area.
Concrete Block Foundation: A strong and affordable option. You can build a solid foundation using concrete blocks and mortar.
Pressure-Treated Wood Foundation: An economical choice, perfect for sheds that won't be heavily loaded. Make sure you use pressure-treated lumber to resist rot and decay.

Pro-Tip: Check your local building codes. They might have regulations regarding shed size, foundation requirements, and building permits.

### Building the Framework: Walls and Roof

Once your foundation is set, you're ready to erect the walls and roof:

Framing: Start by building the wall frames. Use 2x4 lumber, making sure to cut them to the exact length. Assemble the frames with nails or screws, and don't forget to add bracing for extra strength.
Sheathing: Apply plywood or OSB (Oriented Strand Board) to the wall frames. This creates a solid surface for siding and provides structural support.
Roof Trusses: For a gable roof, you'll need to create roof trusses. These are triangular structures that support the roof. There are pre-made trusses available at home improvement stores or you can build your own.
Roof Sheathing: Similar to wall sheathing, cover the roof trusses with plywood or OSB.

### Enclosing the Space: Siding and Roofing

With the framework complete, it's time to enclose your shed:

Siding: Choose your preferred siding material: wood, vinyl, metal, or even composite. Install the siding following the manufacturer's instructions. Make sure to use flashing around windows and doors to prevent water damage.
Roofing: Pick your roofing material â€" shingles, metal, or even solar panels! Lay the roofing material according to the manufacturer's guidelines, ensuring proper ventilation and water drainage.

### Final Touches: Doors, Windows, and Finishing

Doors and Windows: Install your doors and windows. Choose quality hardware that's weather-resistant and durable. Don't forget the locks and handles.
Flooring: Choose a flooring option for your shed. Concrete, plywood, or even tile are all viable options.
Interior Finishes: Add insulation to your walls and ceiling for better climate control. Consider painting or staining the interior to create a cozy atmosphere.
Finishing Touches: Add shelving, benches, and other accessories to make your shed functional and personalize it.

### Saving Money: Tips and Tricks

Building your own shed is a great way to save money, but there are some extra steps you can take to maximize your savings:

Scrounge for Materials: Look for reclaimed materials, such as old pallets, leftover lumber, or even salvaged doors and windows.
Shop Around for Deals: Compare prices at different home improvement stores and lumber yards. Look for sales and discounts.
DIY Tools: Invest in basic power tools like a circular saw, drill, and impact driver. These will come in handy for various projects around the house.
Don't Be Afraid to Ask for Help: If you need help with certain tasks, don't hesitate to ask friends, family, or neighbors. It's a great way to build camaraderie and learn new skills.

### Building Your Own Shed: A Rewarding Journey

Building your own shed is not just about saving money; it's about creating a unique space that perfectly fits your needs. It's an exciting project that will leave you feeling proud of your accomplishment. Remember, take your time, plan carefully, and don't be afraid to ask for help. You've got this!

How to design a custom 8x10 shed for cheap and practical use

Posted by gate
How to design a custom 8x10 shed for cheap and practical use


Alright, so you're dreaming of a little extra space, right? Maybe you're tired of tripping over gardening tools, your bikes are taking over the garage, or you just want a cozy little retreat to escape the chaos. An 8x10 shed is the perfect solution for all those things and more!

But, you're on a budget, and that's okay! Building your own shed doesn't have to be a financial burden. It can be a fun and rewarding project that saves you a ton of cash in the long run.

So grab a cup of coffee, settle in, and let's get started on this journey to building your own awesome 8x10 shed!

Step One: Planning and Designing

First things first, we need a plan. Think about what you'll use the shed for.

Storage: Just need a place to stash tools and lawn equipment? A basic shed with a simple door and maybe a small window for ventilation will work perfectly.
Workshop: Do you plan on using the shed for crafts, woodworking, or tinkering? Think about the layout you need for workbenches, lighting, and storage for your tools.
Hangout Spot: Dreaming of a cozy reading nook or a mini garden sanctuary? Then you might want to consider windows, perhaps even a small porch, and maybe even a little electrical hookup for lights and a fan.

Once you know the purpose, you can start sketching out a basic floor plan. There are tons of free shed plans available online, so don't be afraid to borrow inspiration and adapt them to your own needs.

Step Two: Material Choices - Keeping it Affordable

Now, let's talk materials. You want to keep it cheap, but still sturdy and weather-resistant.

Foundation: A concrete slab is ideal for durability, but can be pricey. A cheaper option is a gravel pad, which is still very strong and allows for drainage. You can even use recycled materials for a DIY gravel pad, saving you even more money.
Framing: Think pressure-treated lumber for the foundation framing. It’s resistant to rot and moisture. For the wall framing, standard lumber like spruce or pine is perfectly fine.
Sheathing: OSB (Oriented Strand Board) is a great choice for sheathing. It's strong, affordable, and easy to work with.
Roofing: Shingles are the classic choice, but you can get away with using a cheaper roofing felt and covering it with a metal roof if you're looking for an ultra-budget option.
Siding: Vinyl siding is durable and low maintenance. You can also find good deals on used vinyl siding at local salvage yards, which is a great way to save money.
Doors and Windows: Consider used windows and doors, especially from salvage yards or online marketplaces. You can find great deals on quality windows and doors that are perfectly good for a shed.

Step Three: The Build Process - Slow and Steady Wins the Race

Now for the fun part â€" building! Here's a general breakdown of the process:

1. Foundation: Laying the foundation is the most important step. Make sure your foundation is level and strong to support the weight of the shed.
2. Framing: Use your plans to build the wall frames and roof trusses. Make sure your connections are tight and secure.
3. Sheathing: Cover the walls and roof with OSB sheathing.
4. Roofing: Install your roofing material, working carefully to ensure a watertight seal.
5. Siding: Attach your siding to the exterior walls.
6. Doors and Windows: Install your windows and doors, making sure they are properly sealed and weatherproofed.

Step Four: Finishing Touches - Making it Yours

Now for the fun part: personalize your shed!

Paint or stain: Give your shed a fresh coat of paint or stain. This will protect the wood and add a touch of personality.
Flooring: You can install a simple plywood floor, or if you want something a little more luxurious, add a rubber tile floor or even a simple carpet.
Electrical: If you're adding lights, outlets, or a fan, you'll need to run electricity. Make sure to use an electrician or someone qualified to handle this part.
Storage: Add shelves, cabinets, and hooks to maximize your storage space. Get creative and find solutions that fit your needs.

Building Your Budget-Friendly Shed: Some Extra Tips

Tools: You might need a basic set of tools like a hammer, saw, level, tape measure, and screwdriver. If you don't own them, you can often rent them from your local hardware store.
Help: Ask a friend or family member to help you with the heavier lifting and more complicated tasks.
Safety: Wear safety glasses, gloves, and protective footwear when working on your shed.
Building Permits: Check with your local building department to see if you need permits for your shed project.

The Benefits of Building Your Own Shed

Besides saving money, there are a ton of benefits to building your own shed:

Pride: You'll have the satisfaction of knowing you built it yourself!
Customization: You can design it exactly how you want it.
Learning Experience: It's a great way to learn new skills.
Extra Space: You'll have a great new place to store your stuff, work on projects, or just relax.

Ready to Get Started?

Building your own shed can be a great way to improve your home and save money. With a little planning, effort, and creativity, you can build a custom 8x10 shed that you'll love for years to come!

So, what are you waiting for? Grab your tools, gather your inspiration, and start building your dream shed!

8x12 shed build on a budget: simple plans to follow

Posted by gate
8x12 shed build on a budget: simple plans to follow


Hey there, fellow DIYer! You're looking to build an 8x12 shed and you want to do it on a budget? You’ve come to the right place. Let's dive into making this project a reality, step-by-step!

Planning is Key: Laying the Foundation

First things first, before you even think about picking up a hammer, let's plan this out. We need to get clear on a few key elements to ensure success:

Location, Location, Location: Choose a spot for your shed that’s level, well-drained, and accessible. You'll need a solid base for the shed, so consider whether your chosen spot needs additional grading or soil preparation.
Building Codes: Check with your local building department for any regulations and permitting requirements. It might seem like a hassle, but it's essential to ensure you're building safely and legally.
Material Choices: Think about your needs and your budget. Do you need a super-insulated shed for year-round use? Or is this a basic storage solution? These choices will impact your material selection and ultimately, the cost.

Budget Breakdown: Getting Real

Alright, let's talk money. Building a shed can be done on a budget, but it's crucial to be realistic. Here’s a typical breakdown of costs:

Foundation: This can range from simple concrete blocks to a more elaborate poured foundation. Expect to spend between $100 - $400 depending on your chosen method.
Framing Lumber: You'll need plenty of 2x4s and 2x6s for the walls, roof, and floor. Aim for approximately $300 - $500 depending on lumber prices in your area.
Roofing: This can range from basic asphalt shingles to metal roofing. Plan for $200 - $500 depending on your selection.
Siding: Choose from wood, vinyl, or metal siding, each with its own price range. Expect to spend $200 - $400 depending on your preference.
Doors and Windows: These can be purchased pre-made or constructed yourself. Factor in $150 - $300 for a single door and window.
Hardware and Finishing: This includes nails, screws, paint, trim, and any other finishing touches. Allocate around $100 - $200.

Simple and Effective: The 8x12 Shed Plan

Now, let's get into the nuts and bolts of your 8x12 shed. This plan is designed to be simple and budget-friendly, but can be adapted to suit your needs.

The Foundation:

1. Concrete Block Foundation: This is a quick and affordable option.
Level the ground and set your concrete blocks in a rectangular pattern for the perimeter of your shed.
Use mortar to secure the blocks together.
You can add additional blocks for support in the middle of the shed if necessary.
Ensure the blocks are level and plumb before moving to the framing.
2. Poured Concrete Foundation: For a more durable foundation, you can opt for a poured concrete slab.
Dig a shallow pit to the required depth and width, ensuring the ground is compacted.
Create a formwork using plywood and 2x4s to hold the concrete in place.
Pour the concrete and level it using a screed board.
Allow the concrete to cure thoroughly before proceeding.

The Framing:

1. Floor Joists: Lay 2x6 floor joists across the foundation, spaced 16 inches apart. Secure them to the foundation using joist hangers.
2. Wall Framing: Construct wall frames using 2x4 studs, spaced 16 inches apart. Make sure the bottom plates are level and plumb.
3. Roof Framing: Use 2x4 rafters to create a simple gable roof design. Make sure the rafters are properly supported with a ridge board and collar ties.
4. Sheathing: Attach plywood sheathing to the walls and roof for added strength and support.

The Finishing Touches:

1. Roofing: Install your chosen roofing material, ensuring proper flashing and ventilation.
2. Siding: Apply your chosen siding material, following the manufacturer's instructions.
3. Doors and Windows: Install your pre-made or DIY doors and windows.
4. Trim: Add trim to the windows, doors, and roof edges for a more polished look.
5. Painting: Paint your shed to your desired color.

Building a Shed: Tips and Tricks

Measure twice, cut once: This old adage is crucial! Accuracy is key for a solid and well-built shed.
Use a level: Ensure all your framing members are level and plumb for a sturdy structure.
Utilize safety gear: Wear safety glasses, gloves, and hearing protection while working with tools.
Take your time: Building a shed is a rewarding project, but it’s important to take your time and do things right.
Ask for help: If you need assistance with any step of the process, don’t hesitate to ask a friend or family member for help.

Remember: It's Your Shed!

This guide is a basic blueprint for building your 8x12 shed, but feel free to customize it to your liking. Add a porch, a loft, or even a window box to create a shed that perfectly fits your needs and style.

Building your own shed is a rewarding experience. It allows you to be creative, learn new skills, and create a space that you can truly call your own. So, what are you waiting for? Grab your tools, get your hands dirty, and let's build that shed!

How to build a lean-to shed for quick and easy storage

Posted by gate
How to build a lean-to shed for quick and easy storage

Alright, let's talk about building a lean-to shed. You know, those simple, single-slope roof structures that are perfect for storing stuff, like your gardening tools, bikes, or that pile of "I'll fix it someday" projects. We're going for a quick and easy build here, so don't worry about being a seasoned carpenter â€" we're going for functional and sturdy over fancy.

First Things First: Planning and Materials

Let's think about what we need before we even pick up a saw. First, decide on the size of your lean-to. Do you need something small for a few tools, or something big enough to store your ATV? This will determine the dimensions of your framing. I'm going to assume a standard 8-foot wide shed, but you can easily adjust this to fit your space.

Here's a quick shopping list:

Lumber:
4x4 pressure treated posts (for the supports) â€" Figure around 6-8 depending on length and shed size.
2x4 pressure treated lumber (for the framing) - You'll need a lot here, so think about the size of your shed.
2x6 pressure treated lumber (for the roof rafters) â€" Again, size depends on your shed.
Plywood or OSB (for the siding and roof sheathing) - Depending on your size, you'll likely need a few sheets of each.
Optional: Treated 2x4 for floor joists (if you want a floor)
Hardware:
Concrete mix (for setting the posts)
Galvanized nails or screws
Roofing felt or underlayment
Roofing shingles (asphalt or metal, your choice)
Optional: Window kits, door hinges and handles, paint or stain

The Foundation

Now, let's get that foundation sorted. You'll want a sturdy base for your lean-to, so concrete is the way to go. You'll be setting your posts into concrete footings. Measure out where your posts will go and dig holes about 12 inches deep and 12 inches wide. Make sure they're level! Pour concrete into the holes, making sure the post is centered and plumb (straight up and down). Let the concrete cure for a couple of days before you start building.

Building the Walls

Time to frame the walls! You'll be using 2x4s for the wall framing. Cut the 2x4s to the height you want for your shed (usually 8 feet or so). Attach them to the posts using nails or screws. You'll want to create a stud frame, a series of vertical 2x4s spaced 16 inches apart. This is where you’ll attach your siding later. To make it stronger, you can add diagonal bracing to the walls, like a giant "X" in the middle, which will prevent your walls from swaying.

The Roof

Now for the roof. This is where it gets interesting. Start by cutting your 2x6s to the desired length for the rafters. These will run from the top of the back wall to the top of the front wall. They'll form the angled roof of your lean-to. Now, attach the rafters to the top of the wall framing using nails or screws. Make sure the rafters are spaced evenly to support the roof sheathing later.

Side Note: Think about the slope of your roof. A steeper slope will handle snow and rain better, but it'll also make your shed taller. You can adjust the slope by changing the length of the rafters.

Adding the Roof Sheathing

Time to cover those rafters! Use plywood or OSB sheets to create a solid base for your roof shingles. Cut the plywood to fit between the rafters and attach them using nails or screws. You'll want to ensure the plywood sheets are flush with each other, making a solid surface.

And Don't Forget the Siding!

Now it's time to cover those walls. Cut plywood or OSB sheets to fit between the studs and attach them to the framing using nails or screws. Make sure the sheets are overlapping to prevent water penetration. This will be the base for your exterior. You can also use a more decorative siding material like cedar planks, composite siding, or even metal if you want a more finished look.

Roofing Time

You're almost there! Lay down a layer of roofing felt or underlayment over the plywood sheathing. This will create a water-resistant barrier underneath your shingles. Then, start applying your chosen roofing shingles, following the manufacturer's instructions.

The Finishing Touches

Now for the fun part! Add a door or window (if desired), using hinges, door frames, and a latch. You can also add trim around the doors and windows to give your shed a more finished look. For extra protection, paint or stain your shed to preserve the wood and give it a custom look.

The Floor

If you want a floor for your shed, you'll need to add some framing before you start. You can use treated 2x4s to create joists running across the width of the shed, spaced about 16 inches apart. These joists are supported by the wall framing and can then be covered with plywood or OSB for the final floor.

Safety First!

As with any construction project, safety is paramount. Wear safety glasses and work gloves. Use proper lifting techniques, and be careful when working with power tools. Always have a fire extinguisher and a first aid kit on hand, just in case.

And That's It!

There you have it! You've built yourself a lean-to shed, ready to store your tools and all those "I'll fix it someday" projects. You've just added valuable space to your property, all through a quick and easy DIY project. Now go enjoy your new storage space! And don't forget to show off your handiwork to your friends and family. You'll be the envy of the neighborhood. Happy building!

How to use storage shed plans to create a durable shed

Posted by gate
How to use storage shed plans to create a durable shed


So, you've got your shed plans, you've got your tools, you've got the coffee brewing. You're ready to build! But wait, before you jump into the project, let's talk about making sure your shed is not just built, but built to last.

Building a shed is a fantastic project, a perfect blend of creativity, problem-solving, and sweat equity. You'll end up with a functional space you can personalize to your heart's content. But just like with any project, there are some key steps to ensure your shed stands the test of time.

Starting Strong: Foundations and Framing

Think of the foundation as the bedrock of your shed. It's the unseen hero that takes on the brunt of the load.

Choosing the Right Foundation: Don't underestimate the importance of choosing the right foundation. It's not just about leveling your shed, it's about protecting it from moisture and movement.
Concrete: This is the most durable option, but it can be more expensive.
Concrete blocks: These are a good middle ground, offering stability and some insulation.
Pressure-treated skids: For lighter sheds on well-drained ground, pressure-treated lumber provides a solid base.
Framing for Durability: The framing is the skeleton of your shed. It's what holds everything together.
Lumber Selection: Opt for pressure-treated lumber for the foundation and floor joists, and choose high-quality, straight lumber for the walls and roof framing.
Joints and Connections: Proper joinery is crucial. Use strong, sturdy joints like mortise and tenon joints, or reinforce with metal brackets and screws.
Sheathing: Use plywood or OSB (oriented strand board) for sheathing. This adds rigidity to the walls and roof and provides a solid base for siding.

Keeping It Safe: The Roof and Siding

The roof and siding are your shed's armor, protecting it from the elements.

Roofing: A sturdy roof is essential.
Shingles: Asphalt shingles are a common and affordable choice. Consider getting a higher grade of shingle for greater durability.
Metal Roofing: This is a long-lasting option, resistant to fire and weather damage.
Ventilation: Ensure proper ventilation to prevent moisture buildup in the attic space.
Siding: Choose siding that complements the style of your shed and provides weather resistance.
Vinyl siding: This is a popular choice, easy to maintain and resistant to moisture.
Fiber cement siding: Durable and fire-resistant, but slightly more expensive.
Wood siding: Classic look, but requires more maintenance.

The Finishing Touches: Doors, Windows, and Insulation

The finishing touches not only add beauty but also impact the functionality and energy efficiency of your shed.

Doors and Windows: Select sturdy doors and windows that are well-sealed and weather-resistant.
Insulation: If you're planning to use your shed year-round, consider insulating the walls and ceiling.
Fiberglass insulation: A common and affordable option.
Spray foam insulation: Provides a high R-value and seals air leaks.
Painting or Staining: Paint or stain your shed to protect the exterior and add a touch of personality. Choose exterior-grade paint or stain that is weather-resistant.

Beyond the Plans: Building with Confidence

Don't be afraid to make changes to your shed plans based on your needs and preferences. For example:

Adding a Loft: If you need extra storage space, you can add a loft above the main floor.
Adding a Window: A window can bring in natural light and make the shed more inviting.
Adding a Porch: A porch can create a cozy space to enjoy the outdoors.

Safety First:

Always wear safety glasses and gloves when working with power tools.
Double-check your measurements and cuts.
Never lift heavy objects alone.
Take breaks and stay hydrated.

The End Result:

Building a durable shed is a rewarding project. It's a labor of love, and by taking your time and focusing on quality materials and craftsmanship, you'll create a lasting structure that you can enjoy for years to come.

Remember, it's not just about following the plans; it's about building with confidence and making your vision come to life. So go out there, grab your tools, and build a shed that's as unique as you are.

How to create a lean-to shed for compact backyard storage

Posted by gate
How to create a lean-to shed for compact backyard storage


Alright, so you've got a small backyard and it's starting to feel like a cluttered jungle. You've got lawn chairs piled high, gardening tools threatening to take over the patio, and you can barely remember where you last saw your grill. Sound familiar? Well, buckle up, because we're about to turn that tiny backyard into a storage oasis with the help of a lean-to shed.

Let's face it, those pre-fab sheds can be expensive and often don't fit the aesthetic of your backyard. Plus, sometimes you just want a project that lets you flex your DIY muscles. A lean-to shed is perfect for small spaces because it's essentially an extension of an existing structure, like a fence or even your house! And the best part? You can build it yourself.

Before we dive into the specifics, let's talk about the benefits of a lean-to shed:

Space Saver: Lean-tos are designed to maximize your limited space, using an existing wall as one side. They're perfect for small backyards, patios, or even squeezing into tight corners.
Flexibility: You can customize a lean-to to suit your needs. Want to add a window? No problem! Need a specific height for your bikes? Done!
Cost-Effective: Building a lean-to is cheaper than buying a pre-made shed, especially if you already have some of the materials.
Aesthetics: With a little creativity, a lean-to shed can add a charming and practical touch to your backyard.

Planning Your Lean-To Shed: Dream Big, but Start Small

Now, let's get down to the nitty-gritty. Before you grab your tools, you need to plan. Here's what to consider:

Location, Location, Location: Choose a spot that's close to the house or a fence, as that will form one side of your lean-to. Consider the direction of the sun and the wind for optimal lighting and ventilation. You'll also want to make sure the ground is level and accessible for construction.
Size Matters: Determine the dimensions of your lean-to. Remember, smaller is better for a compact backyard. Consider your storage needs and don't be afraid to go with a smaller design. You can always add shelves and other storage solutions later.
Building Materials: Decide on the type of wood you want to use. Pressure-treated lumber is great for outdoor use, while cedar is known for its natural resistance to rot and insects. For the roof, you can use shingles, metal roofing, or even corrugated plastic for a modern look.
Foundation: Since a lean-to is small and won't be supporting a lot of weight, you can often get away with a simple foundation made from concrete blocks or treated lumber laid on a bed of gravel. Check your local building codes to be sure.

Construction Time: Let's Get Building!

Alright, now for the fun part! Here's a basic outline of the construction process, but remember to check with your local building codes for specific requirements:

1. Foundation First: Lay out your foundation using string lines to ensure it's square and level. Set your foundation blocks or lumber on a bed of gravel to allow for drainage.
2. Frame Up: Build the frame for the lean-to using pressure-treated lumber. You'll need vertical posts at each end and horizontal beams connecting them at the top. You can use a simple 4x4 lumber for this.
3. Roofing: Attach your chosen roofing material to the frame. You might need to use plywood as a base for shingles or metal roofing. For corrugated plastic, it can be attached directly to the frame.
4. Walls: You'll need to decide if you want to enclose your lean-to completely or just add some partial walls for storage. Use plywood or boards to create the walls, and add a door if desired.
5. Finishing Touches: Add trim around the doors and windows for a polished look. Paint or stain the exterior to match your backyard's aesthetic.

Tips for Success:

Start Small: If you're new to building, start with a simpler lean-to design. As you gain experience, you can tackle more complex projects.
Ask for Help: Don't be afraid to ask for assistance from friends or family. Building a lean-to can be a fun and rewarding experience, and a helping hand can make it easier.
Measure Twice, Cut Once: This is a common saying for a reason! Double-check your measurements before cutting any lumber. It's much easier to correct a mistake before it's part of the structure.
Be Patient: Building a lean-to takes time and effort. Don't expect it to be done in a day. Take breaks when needed and enjoy the process!

Making it Your Own:

Now for the fun part: making your lean-to truly unique! Here are some ideas to personalize your backyard oasis:

Add a Window: Let natural light in with a small window. You can find pre-made windows or get creative with a salvaged piece of glass and some wood framing.
Build a Workbench: Add a sturdy workbench inside your lean-to for crafting projects, gardening tasks, or just extra storage space.
Install Shelves: Make the most of your vertical space with shelves to store tools, garden supplies, or any other necessities.
Add a Door: Create a secure and easy-access entrance to your lean-to with a door. You can use pre-made doors or get creative with salvaged doors.
Decorate: Paint the interior to match your style or add hooks and organizers for added functionality. Don't be afraid to show off your personality!

So, there you have it! Building a lean-to shed for your compact backyard is a fantastic way to gain extra storage space while adding a touch of charm to your outdoor living area. With careful planning and a little elbow grease, you can turn that cluttered jungle into a storage wonderland!

Newer Posts Older Posts Home
Powered by Blogger.

Blog Archive

  • ▼  2024 (52)
    • ▼  November (38)
      • DIY Wood Pallet Shed: Build a Sturdy and Reliable ...
      • DIY Pallet Shed Plans for Cost-Effective Outdoor P...
      • 10x12 Pallet Shed Plans for Gardeners and DIY Enth...
      • Create a Functional and Stylish 10x12 Pallet Shed ...
      • 12x20 Shed Plans with Loft: Maximize Storage and S...
      • How to Make a Pole Barn with a Foundation for All ...
      • How to Build a Pole Barn with a Classic Gambrel Roof
      • How to build a small and affordable 8x10 shed for ...
      • Diy lean-to shed project: a practical storage solu...
      • Diy garden shed projects for homeowners with limit...
      • Diy 8x12 shed plans: how to design it, build it, a...
      • How to design a custom 8x10 shed for cheap and pra...
      • 8x12 shed build on a budget: simple plans to follow
      • How to build a lean-to shed for quick and easy sto...
      • How to use storage shed plans to create a durable ...
      • How to create a lean-to shed for compact backyard ...
      • How to select quality 10x12 storage shed plans
      • How to build an 8x12 shed that looks expensive on ...
      • Garden shed design ideas: diy plans to build for less
      • 8x10 shed plans: how to create a low-cost diy stor...
      • How to build a 12x16 garden shed to last for years
      • A step-by-step guide to 10x12 storage shed plans
      • How to design an affordable 8x10 shed that fits yo...
      • How to create a beautiful garden shed with cheap d...
      • How to customize your diy 12x16 garden shed
      • How to build a simple, affordable 8x12 shed from s...
      • Choosing storage shed plans that match your budget
      • How to add windows and vents to your diy garden shed
      • Simple diy storage shed plans for new builders
      • How to build a sturdy 12x16 garden shed for all yo...
      • Diy 10x12 shed: low-cost construction with great r...
      • Diy tips for building an affordable and functional...
      • Diy tips for building a 12x20 storage shed
      • Planning and building your own 10x12 garden shed
      • How to build a pallet shed step by step
      • How to use shed plans to build a backyard retreat
      • Best shed plans for storing sports equipment
      • How to use shed plans to create a cozy outdoor ret...
    • ►  October (14)
  • ►  2020 (187)
    • ►  November (31)
    • ►  October (156)
  • ►  2017 (391)
    • ►  December (106)
    • ►  November (100)
    • ►  October (106)
    • ►  September (63)
    • ►  August (16)

About This Blog

Featured Content

Follow Us

"© Copyright 2014" Eleven 40 Blogger · All Rights Reserved · And Our Sitemap · All Logos & Trademark Belongs To Their Respective Owners·
Template Developed By Blogging Recipes.